Here you can find Solar Panels and technological accessories related to Solar Energy: Click Here If you want to learn about Solar...
Here you can find Solar Panels and technological accessories related to Solar Energy: Click Here
If you want to learn about Solar Panels, to advise you before buying or to build your own Solar Panel: Click Here
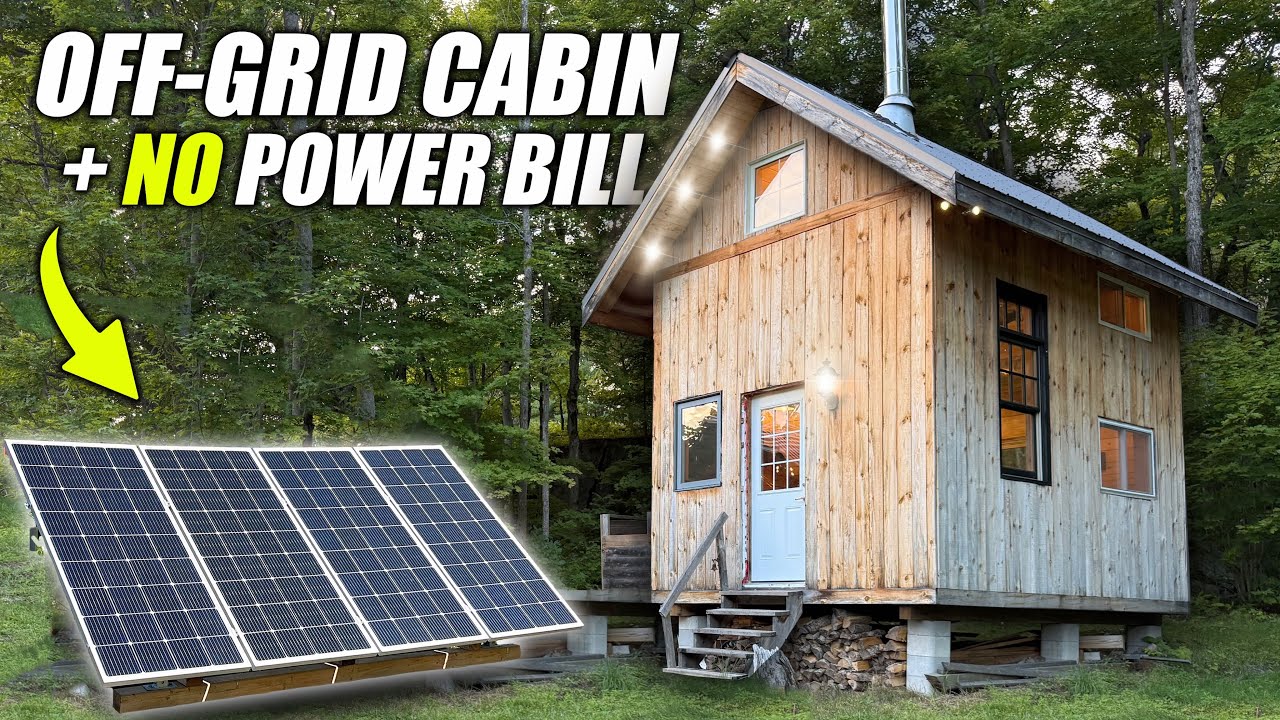
[Music] I started building this cabin on a remote property about 7 years ago, but since then it's kind of evolved into this whole little homestead with an outhouse, a little workshop, a screened in porch, and pretty much everything you would need to live off-rid year round. Now, when I first built the cabin, I did plan it out with the potential of being tied to the grid one day. So, I have lots of plugs, lights, different appliances, everything that you would have in a standard household, but just with the potential to be tied to the grid in the future. So, this was just forward thinking at the time. But now, it's nice that I can upgrade that system without having to open up the walls of the cabin and install new outlets or upgrade the lighting. So, come along and follow my journey without the blackflies setting up all of our new EG4 equipment. Like we always say at the lab, we do like to actually put our equipment through some real world testing. So, we're excited to put it through yet another off-grid build. We do have a few different cabins and tiny homes that we like to run some equipment through so that we can make sure we're giving you guys an honest review on a lot of our products. For this upgrade, I chose the EG4 6000XP offgrid inverter, two 100 amp server rack batteries, and a 3 kW solar grid mounted on the Chico ground mount. just like we installed back at the lab. So, in the past, I was running a pretty basic tiny little makeshift off-grid system where we've got a couple hundred W panels, some 12vt batteries, and a small inverter. But we've got a nice upgrade here with some EG4 batteries, lithium batteries, 6000XP inverter, nice big server rack cabinet, some new wiring, solar mounts, and seven really nice big 430 W panels that we're going to set up. So, the reason we went with a 6000XP from EG4 is just based on the demand of the cabin. For the most part, we're running LED lights right across both inside and outside. We've got a mini bar fridge. The stove is gas powered and the on demand hot water tank. So, we don't need a ton of electricity. Um, we do have a stereo running here and some internet on the side which we like to keep going so we can stay connected cuz we are very remote here. Are you crazy? And then the plan is to set everything up in the existing pump house. And the biggest perk is that I will now have access to 240 volts which I didn't have through my inverter or my generator before. The significantly larger solar grid also ensures that I will be able to produce any power that I use day-to-day. So I don't have to worry about a rainy day getting in the way of my power production. Now luckily where the cabin is, we have awesome southern exposure. So getting those panels to run at their peak performance is no problem here. Plan for the panels. Um we're thinking so we're south facing here. Front of the cabin faces south. So, if we can put them along the river here, we're thinking up on the mound here so that we have full southern exposure and then I don't lose my views out the river because why would you want to lose that nice view? The setup of this project was a prime example of why it's important to understand how your product is being shipped. When it comes to getting everything to this remote site, I have to take everything from my pickup truck, transfer it into an ATV trailer, transport it down a small little trail, and then unload it all again here. The largest items were the Chico ground mount. All the components of the legs are fairly disassembled, so it wasn't too hard. But you still have to be aware of how big these items are coming. The panels were probably the next biggest awkward component. But luckily that day I had help so someone could drive the ATV while I kind of sat on the panels and secured them. When it comes to all the EG4 product, those were all boxed up really nicely. They were easy to pile in the ATV, get them down here safely. That was probably the easiest step to getting everything down. For the new panel stand, I chose a spot beyond the tree line so I wouldn't have to worry about them being shaded at any part of the day. And with us being south facing, they're going to do an awesome job at producing as much power as possible as long as that sun is out. So, first step before we start assembling our Chico ground mounts over here is going to be cut down a few of these trees. Now, the concern with these is that they're ash trees which are dying off and if we don't cut them now, they may fall on our panel stands. So, we're going to get the chainsaw out, take care of these few trees, and then we can start putting our footings in for our panel stand. [Music] We're going to go back to the truck, load up the ATV, get our Pillex ground screws, and then screw them into the ground out here and get ready to put our beams across before putting the mount down. [Applause] For the solar mount for this project, we're using the Chico ground mount system. So, this is an extension of the big setup that we have back in the lab. This is about three sections worth of that. It'll be large enough to handle our seven panels and more. So, hopefully once we get it all set up on the mount, it gives us some room for expansion as well. Same thing with the server rack cabinet that we have. This is EG4's three battery server rack cabinet. We're starting off with two 100 amp hour batteries, so we will have some space for expanding in the future, especially since our 6000 XP can handle both more solar power and battery capacity. [Music] So, with this panel stand set up, we're going to start laminating a couple 2 by sixes together to create a beam to bridge one footing to the next. That way we don't need a footing under every leg set of the the Chico ground mount. So, we are working through the rain. I managed to get the solar racks up alone, which you'll see that was a little tricky. Don't recommend trying to do that with one person. More than one set of hands is definitely good. Next step is mounting the horizontal rails to join each set of legs. I'm going to have to do some ratchet straps on the back end for the cross braces because the uh the galvanized ones are too long that come with the set. But my hands are so pruny, my boots are soaked. The next step was mounting all my new panels. Now, this was also a little bit difficult as one person because the ground mount is fairly high, but that will be a benefit as we'll talk about shortly. Once the panels were installed and wired, it was time to move over onto the inverter. So, this is our existing pump house setup. So, we've got our tankless water heater, our pump, which brings water up from our tank, pumps it inside to everything hot and cold. The plan is to bring our server rack cabinet in here, hang our inverter in here on the wall, and then add the new sub. [Music] I installed the batteries and then started wiring them back into the inverter along with their communication cables. Now, with both the inverter and the batteries being EG4, the installation went super smooth. I was able to get them up and running probably in about less than an hour without any additional commissioning or upgrades. So, we've got our new solar grid feeding our inverter here. You can hear the fans running. We've still got it open, so we don't want to shock ourselves, but we do have solar input and we're charging the new batteries. Seeing that solar power flow into those batteries for the first time was like magic. After struggling through here with only 200 watts, it was pretty incredible to see that volume of power start charging up those batteries. Within an hour or two, they were already full and I could just start burning all the power I wanted. [Music] So, with being remote, as you know, when you don't have something, it's not easy to just run to the hardware store and pick it up. So, in this case, I was lacking the rest of what I needed to finish tying in my sub panel. So, next trip up, I had everything. I tied in the main sub panel as well as the line that supplies most of the cabin. The cabin uses so little power daytoday other than the internet and the stereo running. We don't need lights at during the day. The fridge might be on, might not be, depending on what kind of weekend we have. And the inverter is pretty much just sitting standby right now. The batteries are already full after all of our consumption last night. And it's just sitting there waiting for us to start burning some electricity. With the panel installed, I was able to run the shielded AC cable into the cabin. Now, the plan is to update that pump house. As you know, those batteries don't like being in the cold, and they do have BMS monitoring in there that will shut them off below, I think, somewhere around minus 20. Because I'm not here all week, I will have lots of power. So, I'll probably install a little baseboard heater in there and just keep those batteries above zero so that they're nice and comfortable and functioning when I come up in the middle of winter. The coolest part about running this system for the first time was being able to come out here at night and turn everything on. So, I've got all these chandeliers in the sun porch, flood lights on the outside of the cabin, pot lights inside the cabin, the internet was running, the stereo was on, and I didn't have to worry about anything. I didn't have to worry about overloading the system because our capacity of 6,000 watts is way more than I will consume. But I also didn't have to worry about power consumption in regards to the storage I had in those EG4 server rack batteries. Those batteries have way more capacity than the little 12volt batteries I had tied in. It's that feeling of security that really makes it worth upgrading the system so that you are fairly comfortable even when you're off-rid. Now, to put it in perspective of just how easy this EG4 6000XP inverter was to tie in, I had this entire inverter up and running within a couple hours off-rid, meaning I didn't have to go online and update anything. The batteries were able to communicate really well with the inverter right from the start. And all of the hardware inside the inverter is really sturdy, great connections, and it was easy to get going. To compare that to something like a Growatt that we're working in the lab right now, I've spent days trying to get that equipment up running and commissioned, updated, firmware updates, and it's just been such a headache. If you're looking for something really easy, the EG4 line is a no-brainer. We work with a lot of different product at the lab and we talk about EG4 a lot and it's not because they pay us to do that. Our opinions really can't be bought here at the lab, but when it comes to EG4 products, they speak for themselves. For an off-grid setup like this, the 6000 XP really is perfect. It's way more power than we'll ever need here, but the installation was just so easy. [Music] So, I found that with everything running, the load was still only sitting around 400 watts, which for a system like that is pretty small. So, with this new setup, I'll be able to continue adding loads so that I can tie things in just beyond the bare essentials. It doesn't have to be what I need. Now, I can kind of supplement things that I want. We'll definitely keep you updated on how this thing runs through the winter. It'll be nice to see with the different hours of sun as well as any snow loads that we have sitting on those panels how that will affect our solar production and consumption. That's all we have for you for today, guys. Check out the links down below for any discount codes we can get a hold of. But for now, peace out and stay charged. [Music] ...


No hay comentarios