Here you can find Solar Panels and technological accessories related to Solar Energy: Click Here If you want to learn about Solar...
Here you can find Solar Panels and technological accessories related to Solar Energy: Click Here
If you want to learn about Solar Panels, to advise you before buying or to build your own Solar Panel: Click Here
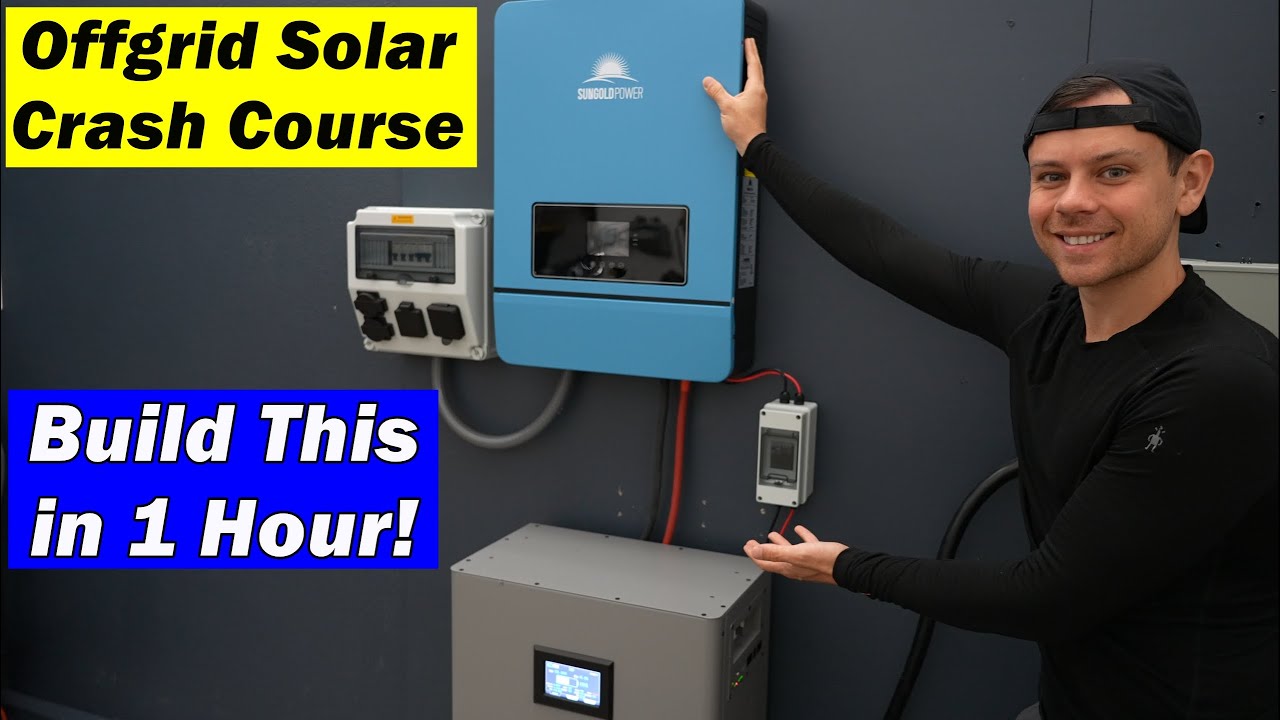
Now, a few years ago to build this type of system, it used to take a lot of money, a lot of time, and a lot of expertise. You'd have multiple modules on the wall. You'd have multiple batteries connected. There was a lot of stuff that could go wrong. But now, you can build this entire thing in under an hour. All I did is connect this battery to an all-in-one. I connected an outlet box, and then I connected a solar PV disconnect. So, this connects to your solar panels. This connects to your loads and then you have a battery on the ground. It is literally that simple. Now, so today we're going to do a crash course. I'm going to go over the major components and what you need to know. Now, first you need a large 48vt battery. These are getting cheaper and cheaper every single day. This one has 16 kilowatt hours. So, that means you can run 16,000 watts for 1 hour or you can run 1,000 watts for 16 hours. It's very simple. And every battery has a positive and a negative terminal. And over here are the main terminals. This is how we connect this battery to the system. We have a negative, which is black, and a positive, which is red. Now, before you work on a battery, you need to turn it off. So, there's a main breaker, and we're going to switch it to the off position. Once the battery is turned off, you can safely connect battery cables. These are very common and easy to find. And these cables connect the battery to the all-in-one. The reason it's called an all-in-one is because it has an inverter, an AC battery charger, and a solar charge controller allinone. And all you have to do is connect them with some very common battery cables. So throw the battery on the ground, mount this on the wall with some screws, and then connect two cables. That's it. Now, connecting the battery cables is very simple. You have a positive and a negative. Then you tighten it down with a socket. This is a size 13. Now that the battery is connected, we need something to charge the battery. So, we're going to connect solar panels. So, this right here is called the PV input, but it doesn't have a disconnect switch. And for safety, for beginners, you're going to want to add that. And these are cheap. This is like $30 or $40. And you connect it right here. And you'll have a positive and a negative. And then over here on the terminals, it will say positive and negative. But this is directional. So make sure that the other end looks like this. This is going to plug into your solar panels. And you want to connect this first before you connect the solar panels. And then when you do connect the solar panels, you need to make sure that this is switched in the off position like this. It will show green. Now, typically a solar array is far from the system. So, you want to connect this to an MC4 extension cable, and I'll have it linked down below. And after you install this and connect these two wires, you just plug this into the extension cord, and you can connect whatever solar panels you want. You can throw some solar panels all on the ground or you can build an off-grid ground mount. So, I'll have a link down below. Typically, for these all-in- ones that connect to 48vt batteries, you want a minimum of 200 volts. So if you have 40 volt panels, you want at least five panels connected to each other in series. And then you just connect them to the extension cord and you connect them to this. There's no other way to do it. Once this is connected properly, so this is very simple. After it's all connected, then you can switch it on right here. But don't do this until everything is completely done. We don't want to turn anything on until everything is connected. Now, for the last step, we want to use the power that this system generates. And every all-in-one has an inverter output or an AC output. This one is a 12240 volt splitphase inverter. So, we have two hots, a neutral, and a ground. So, that's four conductors and three of them are going to be current carrying. So, they have to be properly sized for the application. Now, this inverter can output 10,000 watt. So if you divide it by 240, you get 41 amps. So you want to find a conductor that can handle 41 amps continuous. And to give us some headroom, let's call it 50 amps. Now this terminal can handle 6 gauge wire. And that wire with thhn, which is super common at Home Depot, can handle 55 to 65 amps depending on the temperature rating of the insulation and and the temp rating of the terminal. So for this application, six gauge is fantastic. And this is very easy to find. So if you have a 10,000 watt inverter, just connect six gauge thhn and you need four conductors. The ground can be 10 gauge because that's not current carrying. It's just so that you have a reference potential for the entire system. Next, you need flexible conduit to put your wires inside. And again, it's very simple. Shove the wires inside, connect them to the screw terminals, tighten it down. Also, you have to strip the wire. Let me show you how to do that real quick. So, this is two gauge, much thicker. You just cut it, then you use a wire stripper, and then you shove it in the terminal and screw it down. Very simple stuff. Just use the right size conductor and you're set. Now, this is an outlet box. It takes seconds to install and it's very convenient. You have breakers, you have outlets, you wire it up, and you can plug in your loads and you're good to go. Now, if you're trying to run a cabin or a house, you're going to have to put a real load center. It's a breaker box. So, you might want to hire someone because that's not very beginner friendly because everything in that thing needs to be sized appropriately. For this, this is very beginner friendly. You connect this directly to the AC output with wire that you can get at Home Depot in a few minutes. And it has the breakers, it has outlets, and you just wire it up and you're good to go. So, let me show you how to hook this thing up. And remember, nothing should be turned on yet. The solar should be off. The battery should be off. Everything should be off. And then you connect this. This might look intimidating, but it's dead simple. You have a hot, a hot, a neutral, and a ground. That's all you need to know. You can ignore everything else. Also, this should be red. I had to mark it as red because I ran out and they didn't have any more at the store. So, the two hods should be black and red. And then the neutral is always white. And then the ground is green. So just connect it right here, right here, and right here. And it's all labeled down here. The N is for neutral, green is for ground. And these are black and red. So just match up the colors. One thing you should do is check if everything is tight to hold these breakers down. And then make sure every single terminal is nice and tight. Oh, here's a loose one. So on the neutral bus, we found a loose screw. So let's test all the others. Oh, that one was a little loose. Then test these ones. Oh, those are really tight. And that's it. This thing's all connected. And then wiggle them to make sure everything is nice and tight. Also, you could secure this conduit to the wall. I forgot to do that. Now, let's safely turn on this system. First, we're going to turn on the battery. So, make sure everything is turned off first and then turn on the circuit breaker and then turn on the battery second. That will charge up the capacitors inside of the inverter. And then turn on the inverter. There's a small on andoff switch on the bottom. And then the screen will turn on. Then give it about a minute to start. And there we go. 120 volt. So we should have power at our outlet box. And there we go. It actually works. This thing can level to charge a Tesla. I put almost 100 kwatt hours through this thing already. Now this system is very easy to scale. If you want a second battery, just put it right over there, buy some more battery cables, and hook it up. You just need to ensure that these are the right size for this system. 4 is fantastic, but two watt gauge cables do work as well. Also, the limit on solar is 5,000 watts for each input. So, you can connect 10,000 watts to this system. So, this whole carport can be connected to this system. This is about 10,000 watts. Now, this stuff is dead simple. You shove the wire in the hole and you tighten it down and you make sure it's tight. It doesn't get easier than this. But the settings can be quite confusing. Most of the default settings are fantastic with one exception. Under setting 8, battery type, you want to set it to user. And under setting 15, battery discharge limit voltage. This is the low voltage disconnect. So once this battery is too low, it will turn off the loads so it doesn't go any lower. And you want to set this, I would recommend, to 46 to 48 volts. If you don't set this, it will shut this down and put into safety mode and it will be hard to turn it back on. So once you set that one setting, this thing can cycle very easily. The solar will charge it and then you use the loads as you wish. It gets to that low voltage disconnect. It turns off the battery and then will turn itself back on once it has power from the solar. So that's the main setting that you need to change. Everything else is pretty good in here. I don't think you need to mess with anything else. Now, if you're a beginner, I would not use the AC input on any of these units because you have what's called a ground neutral bond and your panel at your house has one and that can get very complex for these systems. So, for beginners, I tell people get a 48vt battery charger, connect it to the terminals, and call it a day. If you need more power, plug it in, and be done with it. If you connect the AC input, you're going to have to make sure that the settings are correct, the wiring is correct, and the wiring in your house is correct to support this. And most electricians don't know how to do that. So, I would avoid that. Just get a battery charger. If you want to charge this with AC, if you need more energy, you should connect it to more solar panels. If your battery isn't charging to 100% every other day or so, you probably need more solar panels. If your battery is not lasting the whole night, you need more batteries. It's very simple. And building the system is dead easy. Now, I mean, you can do this in one hour. Now, having a single unit is dead simple, but if you use multiple and you put them in parallel operation, you have to ensure that the ground neutral bond is perfect and lots of other complicated stuff. If you stick with just one unit and one battery or even two batteries, that's totally simple as well. You will be okay. You just need two cables. You need a disconnect for 30 bucks and then you just wire this thing up. It's not hard. And this can run most things. This is like a gas station for an electric vehicle. You can run a Tesla with this and a small ground mount array. You could throw some solar panels on the ground and charge a Tesla for most people's commute very easily with this system. And you'll be charging faster than most people that have Teslas at their house cuz they're charging off the 120. This one has 12240. So you can speed charge. you can do level two charging. So, very capable system and very cheap and very easy to install. Now, if you have any more questions, check out my forum. I will have it linked down below. Also, I have lots of other beginner videos on how to wire up solar, how to wire up a panel, how to wire up a 100 batteries. It doesn't matter. I've got it. And that's it for this video. Just a dead simple cheap system. And I will see you in the next video. Bite. ...


No hay comentarios