Here you can find Solar Panels and technological accessories related to Solar Energy: Click Here If you want to learn about Solar...
Here you can find Solar Panels and technological accessories related to Solar Energy: Click Here
If you want to learn about Solar Panels, to advise you before buying or to build your own Solar Panel: Click Here
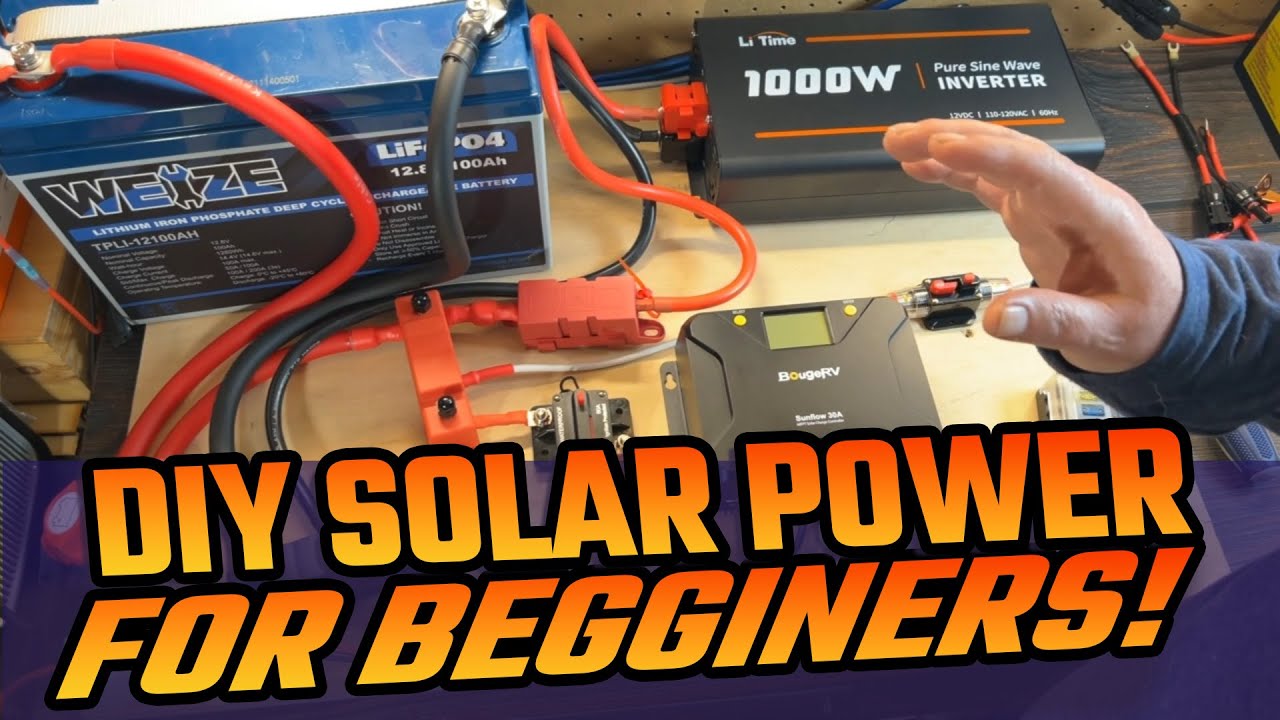
all right today we're putting together a small DIY solar power system that would work great for a van build or a small cabin something like that in this configuration we'll be using a 12volt lithium iron phosphate battery you can pair this charge controller with up to 400 watts of solar panels nicely the controller supports up to 450 watts of solar at 12 volts and up to 900 watts at 24 volts but we'll talk about upgrading them from 12 to 24 bolts later for this video I want to keep it simple and walk you guys through the process step by step of how to hook all this stuff up so let's first take a look at all the components and then begin assembling the system so there's four main components of just about any DIY solar system you got your charge controller which is responsible for bringing in the power from your solar panels which is the fourth component in and converting it into 12volt energy to charge your battery then you have your inverter which converts d DC electricity from your battery into AC power so you can plug in typical household appliances so we want to wire our inverter to our battery and then our charge controller to our battery and the charge controller also goes to the solar panels that are outside but let's get started setting this all up and connecting it all together so we have our charge controller we got our piece of wood here to keep it all or organized and then we have all these other components here we have our bus Bar for our positive our bus Bar for our negative and all this is doing is making it where you can have more wires coming off you can have one wire that comes down here to power this entire bus bar and then you have multiple connections inside here where you can wire the rest of your components to this instead of having to pile it all onto one lug here which they just won't support that many items on one lug so that's why we're going to go ahe and include these bus bars into the setup we have our positive bus bar our negative bus bar that's going to go to our negative and then we have our battery disconnect switch G to you want to get it all kind of laid out before you start wiring to make sure that you're cutting your wires the right length and you have the the configuration and layout that you want this is a circuit breaker for DC which we're going to be using as a disconnect switch for our solar panels again that are outside then we have a breaker a DC breaker to protect our solar charge controller in case there's any sort of short circuiting going on anywhere along the line so we have a protecting a breaker to protect our our charge controller and then we have another breaker here or a fuse excuse me that's going to go between our positive side of our bus bar and our inverter so we're going to go from the negative to the negative here the positive we're going to go here so that you can completely disc connect the system so we're going to bring a positive down to here to have a disconnect then a positive from here to our bus bar this bus bar won't be powered unless this switch is on and that can allow you to disconnect the entire system so that you can safely work can tamper with it then we're going to add a 12vt uh Automotive accessory so if you wanted to add some 12volt lighting or something like that again in a van an RV tiny home or cabin or whatever and then we're going to want to fuse that as well so we're going to add this fuse to protect the entire 12volt system and that's going to run over here like so we'll get to that part later at the end so this is the configuration that I've chosen to lay this out but there's many different options that you can do to wire your system but it's best to lay it all out get an idea of the way you want it to be and where everything's going to be placed this battery in normal circumstances wouldn't need to be here on this box but I'm just leaving it here so that for the view of the camera normally this would be up over here off the screen one of the best ways to get started is to connect all of your negative wiring first so I like to start with the inverter so let's go ahead and get that hooked up and we're going to start with negative components put that over here for right now we get our negative cable now one other thing I wanted to talk about was the cables that come with almost any inverter that you buy I've got many different brands of this the cables that are supplied are will only support the minimum amount of amperage that you need so then for example these are six gauge wires that really wouldn't support a sustained a th000 watt usage so I like to upgrade at least one wire gauge so that's what I'm going to do here these are six gauge I'm upgrading to some four gauge that I happen to have on hand it's not a requirement but I highly recommend always going the thickest wire you can get for your inverter so let's go ahead and set this up this inverter here has these nice little plastic protective covers those off of there and again we're going to go with our negative first so I have this one wire here now you will need some basic tools put everything together a small little socket wrench set or if you really didn't have a lot of tools you could almost put this whole thing together with a simple pair of pliers but since we have it we're going to go ahead and use it want to get that snug but not too snug you don't want to strip anything put our protective sleeve back on there while we're here we'll go and get this wire out of the way ahead and get our Beauty piece off of here get access to here so what we're going to do is hook up the battery negative to right there now this one came with a little Fork style connectors but I like to upgrade them to these type with a a hole in there because it's a safer they can't be pulled out easily so you can take these screws completely out and then go through there let's go ahead and set that up now go ahead and take this screw here let's through our piece of wire here that all the way down on there and so you see you can't you can't pull it off that's why I like these round ones put this flat put this flat down with our washer and a lock washer on top and or nut here's an example these are a little too tall call for any of my particular socket set I'm going to go ahead and do this part with a pair of pliers now we'll go ahead and set up our PV negative which is for our solar panels and get that one set up I got the same thing going with the round end here simple to use this as a little lever on these I like to use a nice feral end with a crimper and a feral but it's not necessary you could use standard bare wire for this so this is our our DC breaker and these are labeled positive and negative we want to use the bottom side because the power's cominging in from the top from the solar outside into the bottom which is here so we're going to put that in here and and we'll get this here we're using some one gauge or one out wire for our negative up here we're not going to connect the battery we're going to save the battery for second to last we're going to go ahead and get the wire ran anyway while we're here lay this off to the side here for right now put that on there we'll hook our in inverter negative up to this one and our washer lock washer and nut I don't have the uh deep well socket that I would need on this side so I'm just going to use these pliers get this tight Tien up absolutely not the best way to do this but you do what you got to do there we go now we'll go ahead and hook up our 12vt as the negative side is here one has two washers so we'll put one down now I have two different size ends on here one is is a really small end put the small one on there another washer lock washer and the nut here Thunder on right there got our washer lock washer and there we have all the negative wires connected next up is the all the positive wires hey sorry for the interruption but I'm a new content creator here on YouTube and I'm trying to get my channel off the ground so if you like this video I'd really appreciate if you click the like button right down there and if you're in the Solar grid stuff why not go ahead and smash that subscribe button while you're at it these things really help the YouTube algorithm to help others find my channel as well plus being a subscriber here has its perks for every milestone in our Channel's growth we're giving away something solar related watch to the end of the video to find out how you can get your hands on some cool free solar stuff now back to the video all right we'll start with our onoff switch and it comes with these little slide out doors so you can position this however you want it has one on all four sides going to set those off to the side for now and we have our big cable that's going to go to the battery and we'll put that here block washer and our not here and then this is going to go to the battery and this piece is going to go to our busar put this cable here off to the side for right now and then we're going to have this going to our fuse we'll go ahead and put that right on there while we're at it now I've already misplaced my pliers so we're going to use this crescent wrench get our fuse apart here then this is going to be the positive for our inverter cover back on and we'll go ahead and connect the inverter B cap back on this has a round side and then this odd ball shaped side here round side goes for the cord going out there we go we have our inverter hooked up now now we'll go ahead and go from our bus bar to our breaker for our charge controller notice I have a small hole and a big hole CU this is a/ quar inch and this is I don't know what we get our other side here hooked up to our breaker the other side to our charge controller at the battery positive now we'll go ahead and hook up our 12 I have this pre-wired here with some 10 gauge coming through going to go on this one you can see now why these bus bars are very helpful when you have so many things to connect more simplified system could be hooked directly to the battery now that goes to this amp fuse I have here just basically a standard Automotive fuse now we'll do our positive side for our solar panels set the load PV positive here all done there for now again we have the fair end is going to go on the other side the positive side on the bottom of our breaker switch now from this side I rigged up this little adapter because I have an adapter cable that I'm going to use to bring in the Solar from outside but it could be mc4 connectors on here or whatever connector that you need you you're Red's going all the way through positive symbol right there want to get these down real tight have a tendency to flip out of there a little bit and then we'll do the same with our negative here and there we go that'll be our solar panels coming in but we're going to want hook that up the very last thing want to get our always connect your battery and have everything turned on and make sure that that everything's working before before you connect your solar panels or you have risk blowing up your charge controller now let's go ahead and put our covers on those just slip right over the top got these little plastic nuts keep anything from short getting shorted out here that on there on our negative side I don't have anything bolted down yet it's going to give us the flexibility we need to make sure we have all the leeway room we need before we screw everything down set this off to the side for right now w but these got little rubber pieces that go over the top to keep again from sorting out now only we need to do is hook up our negative to our battery our negative to our battery and our positive to our battery I already have an existing system right behind this already hooked to this battery so I'm going to disconnect that system now and again to do that safely turn off my solar panels first before disconnecting the battery we'll hook this negative right here disconnect our positive here the side here now this is the positive from our new system that we're setting up here it's always a good idea before you touch the final positive wire where you're completing the connection to use one of these uh resistors to charge the capacitors and anything that may be it helps you prevent getting a spark put that on there for five seconds or so and then we should be safe from having any sort of spark you want to look over the system one last time make sure everything is connected Ed then a safe position back get our solar over here all this over here a little bit more all right everything looks good all right we're ready to go ahead and turn this on and we see we got power to our char charge controller booting up batter is pretty much fully charged here all right I got everything screwed down here and we will uh I added a little little something extra here to use this load feature on this B RV we'll go over that in another video all right let's take a look at this inverter here you see we got 143 volts 108 volts it does drop down below the 110 notice it's just saying a higher load let's goes down here seems a little strange to me that it would reduce down to 104 volts or an even lighter load I'm not sure what that's all about so before I end this video I thought I'd let you know that I'm giving away some pretty cool solar related stuff for every milestone in our Channel's growth I'm a small Channel that's just starting out so I need as many likes and subscribers as I can get so I thought why not take some of the extra solar stuff I got laying around and pay it forward to my subscribers so to find out what the current Milestone is and what I'm giving away next go ahead and watch this video right here and I'll see you in the next video ...


No hay comentarios