Here you can find Solar Panels and technological accessories related to Solar Energy: Click Here If you want to learn about Solar...
Here you can find Solar Panels and technological accessories related to Solar Energy: Click Here
If you want to learn about Solar Panels, to advise you before buying or to build your own Solar Panel: Click Here
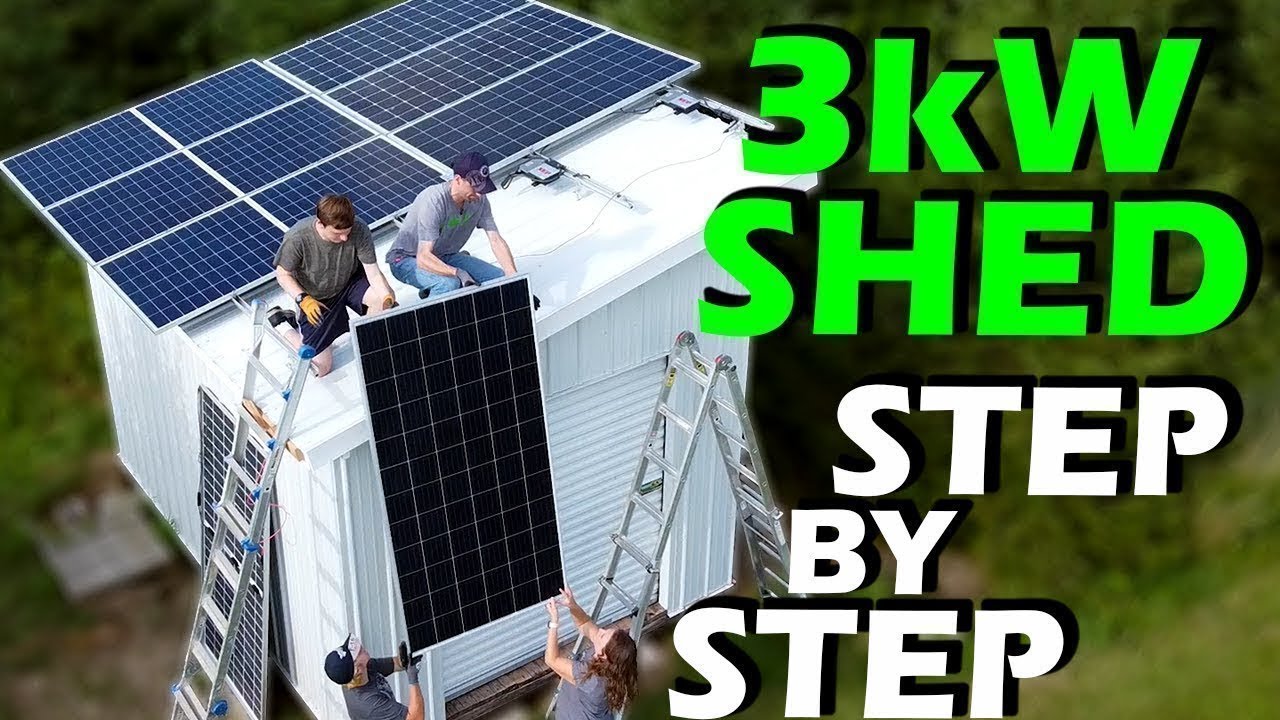
the problem with installing solar is once you start you just can't stop i installed this 9kW array about two and a half years ago and after the first year's analysis i knew it was going to pay off and i really liked having those months when my utility bill is zero let's face it i want every month to be zero so i've been looking for ways to efficiently expand like adding panels facing west and southwest then it occurred to me i have a shed with some available real estate it's not ideal since it faces west and it has some trees surrounding it there'll be a little bit of shade but it already has ac power run to it so if i use ac micro inverters i can get a super cheap install and boost my power plus it has a white roof so i can check and see if the bifacial solar panels will get a little bit of reflection off that and boost the power output welcome back to Projects with Everyday Dave! let's get started installing solar on my shed now the shed is a pretty small build so almost everything we need to install our panels is right here on this table i'm going to use these aluminum extruded rails from k2 systems in order to mount all of my panels and one rail will reach all the way across my shed but if you have a longer install they have a connector bracket that will easily connect multiple rails and make it longer to hold these rails to the roof i'm going to use these l brackets from k2 systems and they will mount right to the side of the bracket and i will connect them to the roof with these ejot fasteners i used this particular one on a previous build and it has a really nice cupped washer that seals to the top of a corrugation however my corrugations have a bump on the top so this doesn't seal very well to that so i'm going to use the flat washer for sealing in the valley it's not ideal to put fasteners through the valley however it's a shed and i know these seal well so we're going to go with that for connecting the panels to the system the one that goes on the end i'll be using this yeti clamp which slides in the end of the rail and attaches the underside of the solar panel so there's no exposed fastener on the end and then i can put a cap on the end of that and it will completely clean up the end of the rail system the other reason i'm using this yeti clamp is the rail isn't long enough to cover all of my panels and this allows me to run the panels right to the very edge of the rail for the mid clamp i'll use k2 system self grounding clamp which is really nice i don't have to run separate ground to every panel this bites in and cuts through the anodized coating on the panel and grounds it to the rails these are very easy to install i just put it in and turn it and now it's ready to receive panels i'll be using only four micro inverters for the eight panels on this shed because each one of these micro inverters can handle two inputs i've been testing these northern electric power bdm 600 micro inverters using my test rig for several months now they've performed really well so i want to use them on my shed and get some larger scale application data from them these are the easiest inverter system to install i have ever tried simply plug in your panels to the mc4 connectors and then the micro inverters connect one to another in a daisy chain and then i'll be able to use this extension cable to run directly from the plug on the micro inverter into my combiner box so there's no box on the roof that's required no extra wiring it's super simple to connect the micro inverters to our rail system i will be using these grounding clamps and they work the same way just a quarter twist you can slide it up slide your inverter in there and tighten it back down to manage the wiring i have a couple different styles of clips this particular clip will slide on the edge of the solar panel to manage the wires on the panel itself this clip slides on the rail system and allows management of wire directly to the rail this clip will hold wires in the rail so i can run wires down the rail and manage them into the rail with this simple snap on clip right on the top if i need to attach something in any other way i have some zip ties for that and you want to be sure and use uv stable zip ties so they don't break down over time and release your wires managing the wires up under the panels on the roof is very important so that you don't have snow or other things catching them and causing problems later on down the line in order to ground our system i need some number six grounding wire either solid or braided like this two grounding clamps to attach them to the grounding rod because it's out at the shed i'll be installing two of these eight foot grounding rods at least here in the u.s code requires two grounding rods unless you can prove the conductivity of the first one so it's easier just to put two in then because each one of the panels is grounded with a mid clamp i simply have to ground each row of panels with one of these grounding clamps which you guessed it slides into the rail just like every other one of k2 systems mounts and then i can attach my grounding wire and that grounds one entire row of panels and i have two of them one for each row i'll have two rows of four panels that will ground our system now that is all i would need if i was doing standard solar panels with regular mc4 connection wires on them however half of the panels i'm putting in are going to be the bifacials which have the very short extensions and in order to extend those up to the micro inverters because i'm going to put them up under the first row to limit shading on the backside i will need some pv wire this is 10 gauge pv wire it's important to use the right wire for this because it has to be uv stable as well and then i will use some standard mc4 connectors and a crimping tool in order to make those extension cables just for that row of panels now that we have all the materials we need let's get to work all right this is a fairly small install and since the roof is pretty square i can just use the edges to determine where to put the rails i'm going to have two sets of rails about 44 inches apart one for the lower string one for the upper string so i'm just going to measure from the edge of the roof and use a wax crayon to mark the roof where the bolts are going to go i'll mark where each bolt goes so that i can be sure it'll hit a rafter because i want it to go into structure first one will be 11 inches up from the bottom two and a half inches in from the edge so that's where the first bolt will go there's a rafter right along this edge next one will be at 55 inches this one was going to be 5 inches down but i think i'm going to put it right in the top rim 49 inches from the edge okay i'll mark the other side we'll put the two end bolts in run a string and then we can mark all the rest and get all the bolts installed i'm going to use two different size drill bits a larger one that matches the shaft of the bolt and a little bit smaller one that will just act as a pilot for the threads there we go very secure bolt ready to receive our l bracket i'll put one on each end and we'll run a string to mark where all the middle ones go and shoot them all in okay drill them and shoot them i'm going to temp set the l brackets that hold in our rail because if i tighten them down now they'll twist and it'll be hard to get the rail attached so i've already set these nuts towards the top of the bolt about as high as i can put them because i want to hold the panels as far up off the roof as possible and make sure we get enough light reflecting behind the bifacials so just drop a washer on the nut on the bracket another washer all right let's go ahead and put the rest on now that all the l brackets are in let's go ahead and attach the rails k2 systems 44x rails are very lightweight and easy to handle and in my case since i'm only putting up four panels i don't have any joints one rail will work for the whole thing i'm just going to quickly stage them where they go and then we'll attach them these have a vertical slot so the t-bolt can just slide right through the hole and then into the channel super quick easy setup how tight just finger tight we're just getting them loosely set clockwise slide it in put it in the slot twist clockwise spin a nut on now we have all the rails temp set i'll run a string line down the edge get them all tightened up both the bottom and the top and then i can put in the micro inverters i'm trying to maximize the amount of space between the roof and the panel so i'm going to set the rail at five and a half inches off of the roof i'll set the top and bottom rail with a tape measure and then we'll use a string line to set the middle now that the top and bottom rails are set to the right height i'll use a string line stretched across the top and bottom rail to set the middle two rails to match that way we get a completely flat array stretching a string line from the top and bottom rail makes it super easy to get everything perfectly flat i just lower the center rails below the string and then raise them up until they just touch and work my way across the roof so i can put the wires where they will go and secure them as i put the panels down and make sure that there aren't any exposed wires in order to do that i've taken the dimensions of my bi-facial panels and laid them out and they will be exactly the length of the rails that i already have on the roof in order to minimize shading on the back of the panels i'm going to put all of the micro inverters up under the monofacial panels this system will be laid out a little bit different than a typical one because the last two panels i'm going to put one module per micro inverter to make sure i don't have any clipping and i can take all the data i need to for the performance of this system typically every two panels would be connected to a micro inverter so our first two bifacials will be connected to a micro inverter up under the top one the next two top panels will be connected to a micro-inverter under the second top panel then i'm going to connect one top panel and one bottom panel to this micro inverter so that these last two panels can be independent on their own micro inverters in order to position these inverters i took dimensions from the end of the rail to where i want to place them so that they will land to the left side of each module i'm putting the micro inverters to the left side of the panel because i'm going to be starting on the left side of the roof and working my way to the right it makes it easy to plug in with the panel standing on its edge and then lay it down and secure it and everything will already be in place each one of the micro inverters has two bar codes that correspond to the two inputs the first input is zero and the second input is one for these last two inverters where i'm only using one input i've made a couple of blank plugs and it looks like it has a wire in it but actually i'm just using it to seal the end there's no plug so they won't make an electrical connection it's just to waterproof the last two connections so there won't be any corrosion or point of water ingress each one of the micro inverters comes with two bar codes these barcodes are the bar code for input zero and input one and when i get the micro inverters placed on the roof i'll come back to the sheet of paper and stick the barcodes on the paper so when i load everything into the gateway and do all the tracking i'll know exactly what each panel's performance is so now that i know where to place each module i can use a tape measure mark the rail where each one of these goes and get them secured to the rail this is the very first micro inverter in the string so we need to close off the connecting cable with a plug now it's sealed so no water can get in i'll just coil it up and attach it securely underneath the panel installing the micro inverters is pretty easy now the cables are a little bit longer than i need for my application so i'll just take advantage of the extra depth in the rail and coil some of the wire up underneath the mount points that way i don't need extra clips and it controls the wire for me one of the things that makes these micro inverters so easy to install is they simply daisy chain with one single plug that snaps together and is water tight now in order to protect the cables i put a little piece of plastic under the mount points for the inverter that's probably not necessary since the bolts for the k2 mounts don't go past the nut but i just want to make sure i don't have any issues these are paint cutting nuts which make sure there is an actual metal to metal contact in order to guarantee a grounded connection between the inverter and the rail that's the grounding system for the micro inverters in order to secure the plug i put two zip ties around the rail i just want to make sure that it never comes loose and i make sure to use uv stable zip ties even though they're under the panels if you don't they will degrade over time then i use a few zip ties to just secure the wires to themselves and around the inverter i don't want any of them sagging over time and catching on snow or something underneath the roof i make the final connection to the micro inverter up at the top rail i wouldn't need to do that except i'm using separate micro inverters for the last panels that will eliminate any clipping and allow me to get data for analysis i'll do in the future a couple of final zip ties secure the cable in place i want to make sure that there's a soft loop anywhere i make loops in the wire we don't want it to be actually kinked right now all the micro inverters are installed we can start putting the panels in i'll secure that one sagging wire up underneath one of the solar panels when i install them i left the plug for the final inverter coiled up right at the edge so i can reach it later i can daisy chain seven of these inverters in a row and i only have five on the roof so later if i want to add a few more i can just reach up connect it to the end plug and put several more panels in series with this array now i can grab the barcode stickers off of each one of these and apply them to my sheet of paper that has the layout for my panels on this array the bottom row of panels are going to be bifacials and bifacials have very short leads for the mc4 connectors so i made up a stack of red and black extension cables that will allow me to extend the length of the cable all the way up the panel and underneath the top row that way i can make sure there's no wires or micro inverters blocking the reflections off the roof that way i can show the best case scenario for any kind of possible solar gain from reflection off the roof okay all the extension cables are put together now we can secure them to the panels and start installing i'm going to use these stainless steel clips that hook right on the edge of the aluminum channel of the solar panel and the extension cables to route our cables up off the end so they'll be out of the way when we set the panel the stainless steel clips i'm using are pretty inexpensive and they work really well for attaching wires to the side of solar panels pretty much all solar panels have the same general flange thickness so they work with pretty much any panel the one drawback is they're very difficult to get off if you have a slot screwdriver you can slide under it they come off pretty easily or you can twist them off okay i've routed everything along the edge as much as possible away from the cells since we're going to try and get reflection off the roof onto the back side but i have to dip back to the inside here where the cross rail is coming across so that i don't pinch the wire so there's a little bit of in out going on there and then we'll deal with the ends up on top of the roof the bifacial panels are very heavy getting them up on the roof is a bit of a challenge time to get the whole family involved i thought it would be pretty easy just to have my boys climb up both sides of a ladder and hand the panel up on the top of the roof but in retrospect it turned out to be a little bit more challenging to do it that way than i thought the rest of the panels we just fed up over the edge or up the end ladder and i carried them to the final location no i need you to help lift down from down there push it up over the rails there you go set it up there got it all right let me have it it's critical to set the first panel in the right spot and i aligned all of the rails so i know that they're straight and square so i can set this one exactly on the edge of the rail since i'm using yeti clamps i don't need to have any of the rail sticking past they can go right on the edge a little more there you go once we had a process down for handing the panels up it got a lot easier since the micro inverters are all already put in place i can manage the wires up top just plug them into the micro inverters make sure that everything is securely attached up under the panels or to the rails and move to the next panel each panel just clips right into the mc4 connectors on the micro inverter no special wiring required you probably don't need four people to do it but it's pretty convenient just to have two below to hand it up to two at the top one of the nice things about putting these panels on my shed is the roof is close enough to the ground we can just hand the panels up and not have to carry them up a ladder which is much harder to do we put the bottom row in first making sure everything is straight and then it's very easy just to put a spacer in to hold the top panels up about a quarter inch or so from the bottom panels i left the last two panels off so i could run the ground wire and do all the final wire management and then just place the last two panels in to finish it off we'll attach those from a ladder off the edge of the roof and we're finished i have two grounding clamps we need to ground each string so i'll put one on this rail and one on that rail we'll connect the ground wire between them this system is super easy to wire we have two wires to deal with at the end since all of these micro inverters daisy chained together there's just one pigtail that plugs in and then i've put a gland on the end of a conduit that conduit will carry our pigtail all the way down to the breaker panel and then we have to have a number six ground wire connected to each row of panels so one connection here on this rail one connection on this rail and then i will use a clip to hold them to the edge of the panel so everything stays up nice and neat and that's all there is to it we're ready for the last two panels really bad yeti clamps will be very convenient in this case i just slide them on before we drop the panels down and then i can pull them out and tighten them afterwards you know you've chosen well in life when your wife is willing to help you put solar panels on your roof it's good to be blessed with such a wonderful family the last couple panels are a little bit tricky as i start to run out of space but i shifted the whole array to the back of the shed so i'd have a little bit of walking room at the very edge last panel was the most challenging as i was trying not to knock my son off the roof but i needed someone to hold the panel up while i reached underneath the other panel to make the final connections since that optimizer is up underneath the monoface panel then from the ladder i could just tighten the last yeti clamps and it's all finished yeah you can see there no wires hanging down lots of clearance underneath everything nice and tidy all right now that the hard part's finished the array is all installed all i have to do is connect it up to the grid so let's get wiring i have a very simple solution for bringing power in the shed we'll use this 125 amp siemens load center it's very inexpensive less than $30 it has two slots and three lugs neutral line one and line two and then in order to connect ground we'll have to add a ground bar we'll use a 20 amp double pole breaker for the power coming off the roof and we'll bring that power in from the bottom and then i have two 15 amp breakers that we can use one for lights and one for an outlet and that's all we need to bring the power in from the house i'll just connect to my conduit with a simple connector and then power off the roof for my flexible conduit i have a connector for that and then two clamps for the ground wire entrance and exit which needs to go out to our grounding rod then i have a package of stickers that will help us identify the back fed breaker on the breaker itself and on the panel it's very important in case someone is accessing it later and they disconnect a breaker they would not necessarily expect the possibility of power to be fed through this now the reality is it's a grid tie system so if the power goes out this will turn off also but it's required by code to make sure that the breaker is labeled as back fat so let's mount it and get it wired up mounting this box is super easy i have a conduit carrying the line from the house coming up from below and i can just slide the wire through and set the box on that and the conduit for the micro inverters is flexible so i can just bend it out of the way feed that cable through and slide it in with no problem use a couple of clamps to get it secured to the board and we're good to go strategically i want to keep my number six ground wire continuous all the way through the breaker box and outside to the ground rods to do that i just feed the ground lug onto the wire before i screw it into the terminal then i don't have to break my cable anywhere so all i have to do at that point is secure the ground lug in the box and feed the cable through the bottom of the box and then zip tie it along the conduit and feed it out the bottom of the shed so i can connect it directly to the ground rod on the outside no breaks to ensure i have sufficient grounding i'm installing two additional grounding rods at the shad national electric code requires that they be six feet apart and typically our ground's pretty soft and i can just push them into the ground with my tractor and i thought i would be able to do that here but it's been very dry summer and so the tractor couldn't push them in without bending them over and i had to pound them in each one i was able to get some distance in but finally i had to switch over to the hammer and go back and forth between Jordan and i as we pounded and pounded and pounded until we finally got it into the ground the easy part then was taking the two grounding lugs and securing the cable through them to the top of each grounding rod and then running it just below the surface to make sure it doesn't get hit by any mowing equipment now we're ready to make the final connections inside i like to bunch up a little bit extra wire in my box that's not recommended it's just what i like to do in case i have to change my mind later i have extra wire to do it so the bottom bar will be the neutral then we'll have line one and line two coming in from the house this is power to the box and then we have the solar coming in from the top and that'll feed the bottom breaker i've used a lot of different wire strippers over the years and this one i'm using now from klein tools is pretty handy i really like the way it works i secure the neutral to the neutral bus from the house and then line one and line two to the line one and line two lugs in the panel and then the ground to the ground bar now make sure all my breakers are in the off position i have three wires coming from the solar array we have a line one line two and a ground so connect the ground first then the 20 amp two pole breaker will carry line one and line two from the solar array a little bit messy but should work then i want to make sure and add a label so everyone knows that this circuit breaker is back fed and a photovoltaic source there we go now we just need to connect it to the house and we'll be ready to turn it on because i have two power sources now my solar edge system with the south facing ground-based array it produces 7.6 kilowatts and it needs a 40 amp breaker for the power that it feeds back our new system on the shed will only need a 20 amp breaker i need to combine both of those loads before they go through the disconnect switch under the meter so i'm going to make a slight detour instead of going straight through the switch into the meter i'm going to come back into the garage and put in this 125 amp combiner box just be a regular 125 amp load center that has multiple spaces i can combine the 20 amps from the shed the 40 amps from my current inverter and those will go through the switch and connect to the main load center with this 60 amp breaker for wiring i will use 12/3 from the shed through the 20 amp breaker 8/3 from the solar edge inverter through this 40 amp breaker these two breakers will be located in this combiner box then from the main lugs i'll use six three to go through the cutoff switch and from there to the 60 amp breaker in the main load center at the meter so let's put it together if the shed was my only array i would connect the sheds 12/ 3 conductor to this ac disconnect and run the output straight into my breaker panel to back feed a 20 amp double pole breaker super easy however i first need to combine the output with my solar edge inverter inside the garage so let's fish the wire into the garage and wire up the combiner box i always measure several times before i drill a hole through the building and most of my house is concrete so this is about the only place where i can drill a hole i'm using a conduit to carry my cable from the shed even though it's direct burial to make sure that it can't get damaged in the trip from the ground up through the building and then i'll use some silicone to seal around it on the outside and the inside just to make sure that no critters or water gets through i rerouted the connection from my solaredge inverter here to our combiner box this will be the power coming from the shed and now this will be the power going back out to the meter i already replaced the eight gauge wire with six gauge wire running through the disconnect in order to carry the increased load of both arrays and i replaced the original 40 amp breaker that supported just the solar edge inverter with a 60 amp breaker keep in mind if you have a load center that is directly connected to the meter like this one only the utility can disconnect the power so make sure to have an electrician for these connections so i'll just slide the box on and get this all wired up i routed all the conductors behind the wall to keep everything nice and neat and clean in order to do that i had to put the clamps on the back of the sub panel and then tighten the screws right before i set it against the wall from there it's very simple strip the sheathing off the conductors back to the edge of the box and then i always like to put a little bit of a bend in my conductors leading up to their mount points that way there's room for heat expansion and adjustments later the six gauge connects to the main lugs and then routes directly to the ac disconnect outside unfortunately the ground wires were a little bit short and so i had to route them less than ideal paths to the grounding bar but it works out okay the back feed breakers always go at the opposite end of the panel from where the main line comes in so i'll put the 40 and 20 amp double pole breakers at the bottom of the panel the 40 amp breaker takes the 8 gauge wire from the solar edge inverter and the neutral goes to the neutral bus the neutral from the shed will go to the neutral bar with all the others and then line one and line two from the 12 gauge direct burial wire from the shed goes to the 20 amp breaker it doesn't matter whether you put the red wire or the black wire on either terminal because the grid tie inverters will phase synchronize with whatever they see it's a good practice to always go back and double check to make sure every lug was properly tightened all right there we go we have our power connection to the breaker panel power in from the solar edge inverter power in from the shed and the string of northern electric micro inverters now we can turn things on and make sure it all works sun's just peeking over the horizon i turned on the breaker and the blade switch outside now it's time to turn on the breakers in our ac combiner box i'll start with the solar edge system it's powering up we're over 400 volts reading 246 volts so the line power is connected while that's powering up let's turn on the shed array the click click was the relays inside turning on now we can see 200 and some watts coming from the main array 225 watts and from the shed array i can use a clamp meter to check the current going through one of those wires 1.1 watts 250 because we have 250 volts times 1 amp that would be 250 watts now that array is facing due west so we wouldn't expect it to be producing very much right now but it's about the same as the main array which is kind of interesting so everything seems to be working i'll let it run for a few hours wait till the sun gets up a little bit higher and we'll see how much power it's producing my solar edge inverter is maxed out and the one on my shed is producing near optimal i'm at 40.5 amps on the 250 volt output that puts us at 10,099 watts i have exceeded the 10,000 watt mark for constant input into my house that is super cool and i can't wait to see the impact that has on my bills now so the system works it was easy to do you can do it too after closing up the panel there are some labels you need to add for safety and code requirements codes may vary in your area so check with your inspector but these are the typical labels needed you need a warning label on the outside of the box letting everybody know that the terminals can be energized in both the open and closed position on a breaker the terminals where the wires come in are not energized when the breaker is in the off position but in a solar system the breaker is back fed so these can be energized even when the breaker's off on the inside of the panel on the door you need a label letting everyone know that this panel is powered from multiple sources in this case it's powered from the grid through the main lugs and is powered from two solar systems the shed and the main array you have to add a label letting everyone not know not to relocate these devices and you need a label for each one of the breakers that is backfed letting everyone know that is a photovoltaic source one for the 20 amp breaker from the shed array and one for the 40 amp breaker from the solar edge main array now that everything's labeled and closed up we're good to go wow the sun is out and we're producing power this was the easiest and lowest cost per watt array i have done yet the simple k2 rail system the discounted panels from santan solar and the low cost nep micro inverters make a great value array anyone can do the nep micro inverters daisy chain with a single plug you only need one inverter for every two panels and it all lands in a regular breaker panel there was no setup required to initialize the inverters i flipped on a breaker and everything just started working i have wiring diagrams and links to the materials i used in the description below using the affiliate links to purchase your materials helps me bring you more content like this i showed the cheapest and easiest way to set up the system however if you want monitoring you can get a gateway to collect the data from the inverters over the ac lines and report it to the internet in a future video i'll show setting up the gateway and the initial performance results from my new shed array so stay tuned and i'll see you next time ...


No hay comentarios