Here you can find Solar Panels and technological accessories related to Solar Energy: Click Here If you want to learn about Solar...
Here you can find Solar Panels and technological accessories related to Solar Energy: Click Here
If you want to learn about Solar Panels, to advise you before buying or to build your own Solar Panel: Click Here
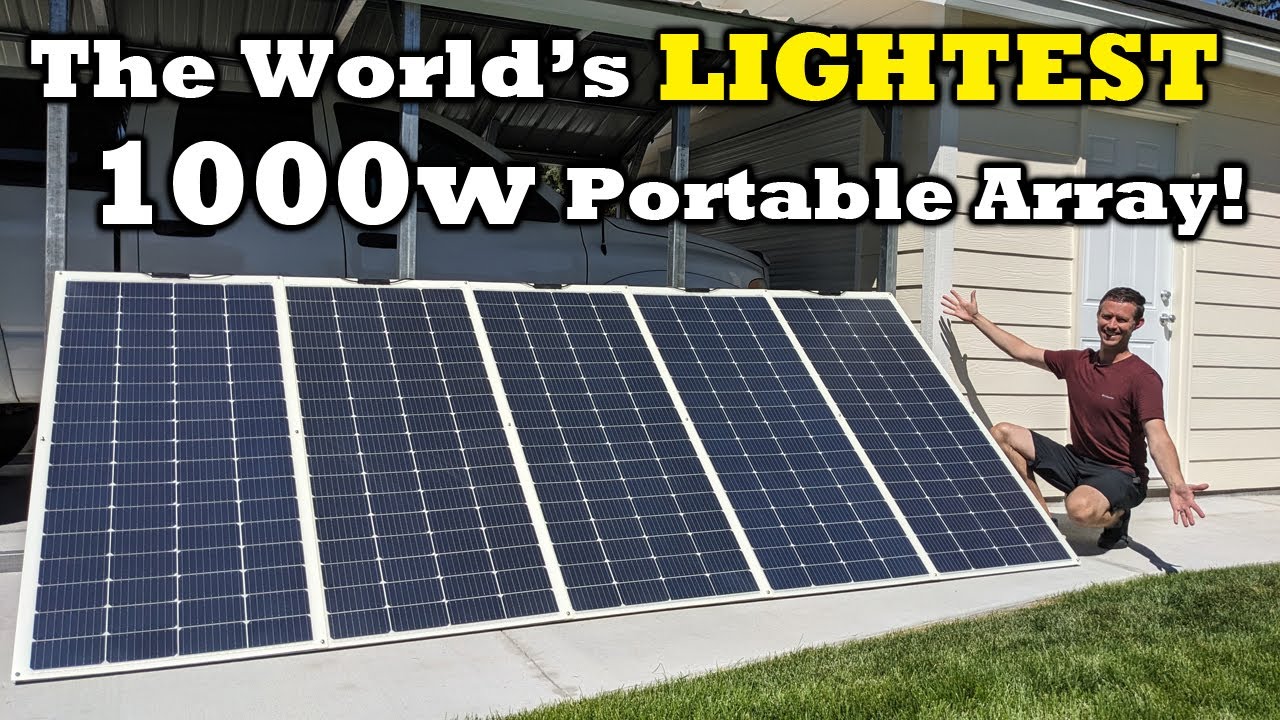
hey everybody welcome back to a new video the goal of this project was to build a 1 000 watt solar array that was both lightweight and compact now this is the finished project I used five of renergie's new 200 watt flexible panels and mounted them all to an extruded aluminum frame for structural support now this array is actually under two inches thick including the junction boxes and the wiring this thin profile allows you to store it away in your garage when not in use or even lean it up against the side of a building because it doesn't take up much space now a little bit later in the video I'll show you guys how I put this together it's actually not that difficult I'll have all the parts down in the video description if you are interested in building something similar but how much power do we actually get from this array now it's rated at a thousand Watts there are five panels 200 watts each wired together in series now I have this connected up to my ac500 power station let's see how many watts we can get now here's the ac500 screen breaking down the DC input so the array on the top the 850 6 857 array is the one we're testing today the one below that is actually my array on top of my shed which uses three residential panels and that's rated for 975 Watts so we're actually seeing slightly more power from these flexible panels versus what we're getting from the residential panels on the roof I'm going to show you guys the solar conditions today it's late summer it's around 93 degrees today just a little bit of haze and not many clouds at all now keep in mind these panels are a bit warm today so if we take my infrared thermometer we can see it's right around 159 degrees Fahrenheit now in a lab these will perform best around 25c or 77 degrees so we're going to lose a little bit of power because these panels are warm so we're seeing about 85 percent of the advertised output on these panels and with it being so hot today and with the additional Haze these are also not angled properly towards the sun this way they're just lined up this way it's pretty impressive output for being rated at a thousand Watts around 850 to 860 watts output now because these panels have an ip60 7 waterproof rating I took my garden hose and sprayed the back of the panels to cool them down because if you can reduce the temperature you'll get more power now looking at my ac500 screen again you can see we've boosted it up to 908 Watts charging input so we got about 50 Watts more by spraying down the back of the panels so there you go guys you do get more power by cooling your panels down now when you take a glass rigid panel like this and compare it to the flexible panels the average weight for a 200 watt panel like this is around 26 pounds so when you add a bunch of these together it can be a struggle to move them around for example I built this 720 watt portable array previously on my channel using glass rigid panels now this has worked really well but it is pretty heavy and takes up a bunch of space in my yard I've been wanting to find another solution that doesn't require so much space and that can be stowed away now for a little bit of contrast each one of these renergy 200 watt flexible panels comes in at 10 pounds so this entire thing assembled together with the extruded aluminum frame only weighs 66.8 pounds and if you were to compare that against an actual glass rigid panel set up like this that would weigh over 130 pounds and that's not even including a frame to hold it all together now I chose these specific flexible panels because of their warranty and design they have a material and workmanship warranty of five years including a performance output warranty of 95 percent after five years and eighty percent output after 25 years now these panels also feature half cut cells and bypass diodes for better accidental shading performance they use perk solar cells which lead to higher efficiency and they also have an etfe coating with nine bus bars for better light transmittance and less resistance within the panel now on the back of each one of these panels you have your specification seats let's break this down so Peak power is going to be 200 Watts open circuit voltage is 23.9 volts which is going to be your Peak voltage you ever see short circuit current so if you take the positive and negative and short circuit it you're going to get around 10.74 amps now under Optimum operating voltage and current you're going to get 20.1 volts at 10.02 amps right around that 200 watt level now it's cool that they have the temperature coefficient on here basically remember in the lab this is tested at 25 degrees C so every degree you go above that you're going to lose around 0.38 of the power output which lines up with our testing we did earlier because this was right around 159 degrees and we lost around 15 percent of the power so that lines right up with it now this is rated at 15 amps so you want to use a 15 amp fuse if you do have these connected together and you can see the weight and the dimensions of the panel at the bottom now let's quickly break down how I put this all together when building the supporting frame I decided to use a 20 series t-slot extruded aluminum because it's still lightweight and somewhat affordable I purchased 10 pieces of 2000 millimeter aluminum from Amazon and this was perfect since my frame design actually utilized all 10 pieces on the screen you'll see a layout of the frame I created a simple design of all the cut lengths so you could replicate this design if you wanted or if you wanted to make a smaller version feel free to pause the video and take notes of the sizes in order to cut each piece to the desired length I used a miter saw with a 40 tooth carbide blade online forums mentioned this would work really well so I tried it out you can see how clean the cuts were using this blade I then attached all the t-slot pieces together using heavy duty corner brackets I used a total of 20 of these corner brackets and they seem to do a decent job supporting the frame this only took about 20 minutes to put everything together I then connected both halves together using a t-slot straight joint connector bracket you'll then want to find a fairly flat area to assemble the two halves of the frame together I used three of these brackets on each joint for Extra Strength the entire assembly process of the frame was fairly simple that was the fun part taking each solar panel one by one and mounting them to the frame now each panel has six grommet holes that allow you to screw them down I used M5 sliding t-nuts and an M5 times 8 times 16 screwed amount each pin onto the frame the middle panel is overlapped on each side which seem to make the array more rigid now after some initial testing I realized that the two legs that I designed into the frame were not strong enough to support this thing up so I ended up removing these two legs with my oscillating saw and I'd suggest leaving the leg extensions out of your design if you end up making something similar now once the panels are securely fastened down to the frame you're basically ready to use this thing now I scoured the internet high and low looking for the perfect 200 watt flexible panel for this project and I finally settled on this panel from renegie because of the higher quality components when I looked at other flexible panels they had hot spots they had delamination issues they didn't put out full rated power and I did not see those issues with these panels because of the higher quality components remember this has the half cut perk cells with nine bus bars it has the built-in bypass diodes and you also have this nice etfe coating so you should get a long life out of this panel now for the actual size of this solar array being a thousand Watts I don't think I'd recommend going any larger than this you definitely downsize this same design and make a smaller array but I would not go larger than 1000 Watts just because it's a little bit wobbly and unwieldy it definitely has structure to it you can push on it and it kind of holds itself there but you want to make sure it's leaning against something so you want to leaning against a building or a carport or a fence or a concrete wall trees whatever you want to do just make sure it's leaning against something so you know it holds itself up because there are no kickstands on this but if you guys do have an idea for kickstands throw a comment down below but I just wanted to keep it as lightweight as possible now what's funny about this is I actually purchased two of these panels with my own money wanting to use them for a different project and then renergy reached out for a channel collaboration and I said hey well why don't you send out three more of these and I'll build the world's lightest weight 1000 watt solar array so here it is guys the project is finished I've been very impressed with the actual output and I will be providing an update six months down the road and a year down the road to see if these handle the rigors of basically being in the sun all day every day now I will recommend a few other videos if you guys want to check those out you can check them out here on the screen and remember all the parts are down in the video description if you guys are interested in putting this together let me know what you guys think about this solar array give me a thumbs up if you like the content thanks for watching we'll see you guys in the next video ...


No hay comentarios