Here you can find Solar Panels and technological accessories related to Solar Energy: Click Here If you want to learn about Solar...
Here you can find Solar Panels and technological accessories related to Solar Energy: Click Here
If you want to learn about Solar Panels, to advise you before buying or to build your own Solar Panel: Click Here
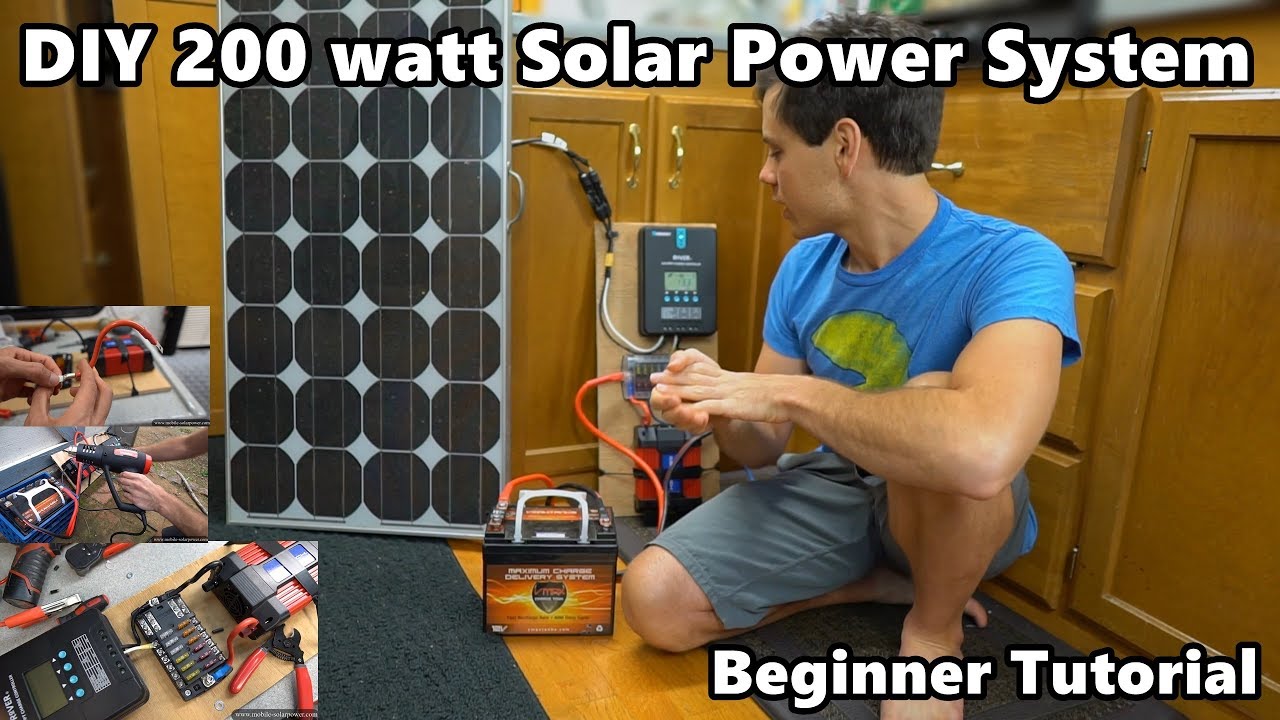
in today's video I'm gonna teach you guys how to build a 200 watt capable solar power system and this is considered the minimalist solar package in my book and on my website and I want to teach you guys how to build this thing from scratch step by step and this is a great size to get started with because most people can build it and a lot of these parts are easy to find in most of the parts you could source locally this video is mainly going to cover how to build this stuff though and we have a solar panel and a battery for demonstration purposes but this is not the right size battery and this is not the right size solar panel so for this size system what I recommend is to 100 watt solar panels wired in series connected to the solar charge controller and a 100 amp hour lithium iron phosphate batteries such as a battleborn or two 100 amp hour AGM sealed lead-acid and even though this system is very small and you can literally lift it up with one hand you can actually scale this system really nicely and if you use the components I recommend on the website you can turn this into a 24 volt system but I did build this system with parts that were laying around so I would not use the rover solar charge controller and I would not use a modified sine wave inverter so please check out my website to see what I currently recommend even though this is a very small and simple system you can scale this system and you can upgrade parts very easily so compared to a solar generator you have a lot more options for expandability so let's say you want to swap out for a 24 volt system this fuse box and this MPPT works with 24 volts so all you have to do is swap out the battery and the inverter but that would take minutes to do also if you go up to a 24 volt system instead of 200 watts this thing can pull in 500 watts so keep that in mind if you want to upgrade to a 24 volt system with this system in the future it's very easy to do just swap out the batteries and swap out the inverter and I think a lot of people will love this size because it's so small it fits in a van everybody can build it it's really easy to build I hope you guys like this video and let's start building it first up is to mount all of these components to the board with some screws now we have the straight confused mounted but I was looking at this MPPT and we want the solar panel wires to come down here and into here so that means instead of having it in the middle of the board we're gonna have a slightly offset over here so that the negative will have less distance to the bus bar and it will look nicer and then I put a little screw right here so they won't slide off this way and pop off because of how the domes are situated most inverters you screw it into the piece of wood but this one doesn't have that so I'm gonna have to figure out something to hold it down with you some mounting tape and see how well that holds I can't find anything I was gonna use some plumber's tape or something but that's gonna look even stupider than this so I'm just gonna use electrical tape but most inverters on the market you screw it into the board so you usually shouldn't have this problem now we can actually wire it up it came with these let's see eight gauge wires I thought they were six gauge and we can connect the inverter first to this fuse box just like that typically you don't want a lot of bending but this will do especially at this wire gauge now let's do the negative so I think right about here will work so I just busted out my box of terminal connectors and I have a connector that fits on this stud and it connects to this wire it's the proper gauge so this will work perfect so first we're gonna strip the insulation off of this wire and it should look like this now you can put inside the terminal connector and see if it fits and considering how much Bend we have in this we need to make sure that the orientation is correct so when we crimp it it needs to be here it can't be over here or like this it needs to be perfect just like that we have a hammer type crimp and we can finish this crimp connection so just stick it in there and then you whack it with a hammer and after you crimp it you can add a hue and it should end up looking like that no we can test if it is a good wire or not and that looks perfect really nice and repeat the same exact process over here first we crimp it and now we need to add heat shrink this is what it looks like when you put the cover back on with both wires it looks very clean and nice most systems I would not have these loops sticky now but these little connectors that they have you can't really have it down here unless I will bend it too much and you can't have it going sideways I'm kind of stuck with putting it this way unfortunately but the easy part we need to connect this solar charge controller to this fuse box and because this is a 20 amp solar charge controller if you multiply that by 1.25 it gives us 25 and we have a 25 amp fuse installed right here so this is the terminal that we need to connect to this first thing you want to do is find a 10 gauge wire and put one of these connectors on with your ratcheting crimper and then I heat it up the heat shrink so this is a basic one you can find at any store and then we need to install it in the fuse box and then see how we need to bend this wire because it's a very tight fit so I'm going to mark it with a marker on where I think it will go in and where it needs to be cut for the insulation and now you need to loosen the solar charge controller terminal all the way so this fire wire fit all the way in there and it actually fits perfectly that is ridiculous if you guys are building this right now make sure that you have at least a couple inches space like it should be a little bit further away that was a little difficult now you need a check and feel to make sure it's in there solid god that's perfect now we need to connect the negative of the fuse box to the negative of this so let's see how difficult that is so I have a 10 gauge wire and we're going to connect it to this one and see how much room we have and this one's a little bit more flexible of a situation than the last time so it should fit just about right here and now that its measured in cut we just have to stick this in the hole and tighten it down like that and then check it to make sure it's in there solid and that's it we have the wiring done for this system that's incredible all right guys talk about minimal losses this is such a small amount of wire to connect these two components together we need to connect some power lines to our battery and I have this 4 gauge cable you can buy 4 gauge battery cables at any Walmart or wherever you're at now we need to put the cover on make sure everything fits just check it out it looks really good I love this design is very simple and small and lightweight you can lift it with one hand and stuff it in the back of a closet you know I added a positive and a negative line to an xt60 connector that supplies mc4 adapters and so this means I can connect any little solar panel to this system the system is rated for 200 watts though so that's the maximum amount of power I can push through these that's it guys tomorrow we can hook it up to some sunshine and a battery guys today is the big day that we're gonna hook this thing up to some solar power but we need to talk about the few sizing engage of wire that we're using so we have 4 gauge and this goes to 8 gauge and this is made for this tiny inverter so for this system we can size the main bolt on fuse this fuse right here that goes to the battery for this cable right here and for this inverter because this fuse box can handle whatever we throw out it in this gauge of wire is really big so this can handle like 100 to 150 amp fuse sizing but we have this weak link right here but this is made for this inverter and because it's a 750 watt inverter it will divide it by 12 volts then we get sixty two point five and then we multiply it by one point two five and I'll give us a few size of 78 and so for this system it could use like an 80 amp fuse as the main fuse but because we're also sharing it with the fuse box and because this wire is so incredibly short it would be able to trip a 100 amp fuse if I had it all over here so for this system if you guys are copying it 100% what you want to do is have a 100 amp fuse and you will be good if you are using a lot of power from the fuse box or you have a larger inverter you will have to size it accordingly for that system so let's say you have a 1500 watt inverter you divided by 12 you get 125 amps and then we multiply it by 1.25 and then you get 156 for inverters though you might have a huge surge if you're doing induction loads if this doesn't make sense to you please check out my book on few sizing and wire gauge because this is a really big topic so yeah for this system though I would say 100 amp fuse would be great right here this is what the fuse it should look like bolted on you can see that the terminal connector on my cable the thick cable that goes over here is flush with this bolt on fuse there is no washers between it there isn't a washer on the outside because the hole is really big but you want these two surfaces the copper to be flush with each other Klee I just use these mc4 connectors for demonstration purposes but if you have solar panels like an array of 200 Watts put them in series if you have this MPPT charge controller or the one I recommend on my website put them on series and then have some extension cables and put them directly in here you do not need this you do not need this just have them feed directly into here but what is smart to do though is to hold the solar panel cables down with one of these with one of these little cable holders that you screw into the board now we get to put it all together and when you put these connectors on a battery make sure that it is flush with the terminal so you want to put it flat on there and have no washers between the fuse and the connector in the battery terminal for this one the hole is too big for this fuse so I'm used I'm using a nut as a washer and when you hook up the second wire and complete the circuit there will be a spark because this inverter has capacitors that need to charge up so actually this inverter is so small that I had no sparks and again you want this connector flush with the battery terminal you want that copper to be only touching the battery terminal so if you look at the solar charge controller you will see that we have thirteen point six volts and that's the battery voltage and it shows night time mode so there's no power coming in right now you can also test out our inverter and a green light just illuminated and so this thing is on and working now that the system's connected to the battery we can finally hook it up to solar panels I angled the solar panel to the Sun because it's a super cloudy day and it's literally about to rain and we actually have power we have one amp going in but this battery is full so we need to put a load on this inverter deplete the battery and then it will start charging up because if the battery is full it's not going to need any power from the solar panels and it will turn off that power but yeah this thing works isn't that cool so now we want a load test this system to make sure that it works so I hooked up a 750 watt heat gun when it's on its lowest setting to the inverter and when you turn it on it should work really well and you want to feel these wires while it's running and make sure that nothing is getting warm check all of your connectors and if something gets really hot and you need to replace it and as you deplete the battery more power will be collected by the solar panel and convert it into electricity okay it's rain so we have to go back inside right now but yeah this system works so I hope you guys like this video and what I love most about this system is it so small look at this you can hold it in your hand but if you guys buy a bigger inverter in a pure sine wave inverter like I recommend on my website it's gonna be bigger and it will extend about down to here but you should be able to fit this whole system on a plank of wood or a small piece of plywood no problem so I really hope you guys liked watching this system be built if you want to learn anything more about it please check out my website in my book there's a lot more information covering this stuff so yeah thanks for watching I'll talk to you guys later bye ...


No hay comentarios